I have created a Development WebCenter sites VM on Tomcat Application server and the installation and configuration steps are given here.
Now, for the better performance, it is advisable to create WebCenter Sites Delivery VM on Weblogic Server. This VM is already created with Oracle Enterprise Linux 6.9, JDK 1.7.0.79 and Oracle Database Enterprise Edition 11.2.0.4. Below are the steps for installing Weblogic and WebCenter Sites.
Weblogic Installation
Detailed steps are given the here. The same is replicated here.
Create the below directories for MIDDDLEWARE_HOME using oracle user in the system.
[oracle@wcsites11g ~]$ mkdir -p /u01/app/oracle/product/fmw11g
[oracle@wcsites11g ~]$ mkdir -p /u01/app/oracle/config/domains
[oracle@wcsites11g ~]$ mkdir -p /u01/app/oracle/config/applications
Add the MW_HOME, WLS_HOME and WL_HOME environment variables in bash_profile before Weblogic installation.
[oracle@wcsites11g ~]$ cd ~
[oracle@wcsites11g ~]$ vi .bash_profile
Add the below entries,
export MW_HOME=/u01/app/oracle/product/fmw11g
export WLS_HOME=$MW_HOME/wlserver_10.3
export WL_HOME=$WLS_HOME
Below are the database scripts for creating the user for WebCenter Sites Installation
DROP USER CSUSER CASCADE;
CREATE USER CSUSER IDENTIFIED BY welcome1 DEFAULT TABLESPACE USERS TEMPORARY TABLESPACE TEMP;
GRANT CREATE TABLE, CREATE VIEW, CREATE SESSION, UNLIMITED TABLESPACE TO CSUSER;
commit;
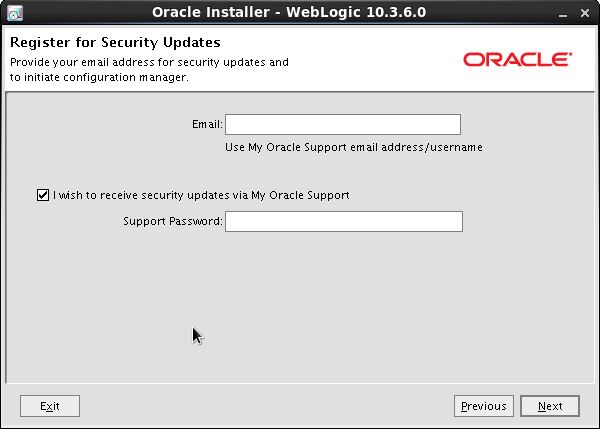
Install the Weblogic Server.
Create the Weblogic Domain
Edit setDomainEnv.sh to update the JAVA Heap variables to get better performance.
if [ "${JAVA_VENDOR}" = "Sun" ] ; then
WLS_MEM_ARGS_64BIT="-Xms512m -Xmx2048m"
export WLS_MEM_ARGS_64BIT
WLS_MEM_ARGS_32BIT="-Xms512m -Xmx2048m"
export WLS_MEM_ARGS_32BIT
else
WLS_MEM_ARGS_64BIT="-Xms512m -Xmx2048m"
export WLS_MEM_ARGS_64BIT
WLS_MEM_ARGS_32BIT="-Xms512m -Xmx2048m"
export WLS_MEM_ARGS_32BIT
fi
MEM_PERM_SIZE_64BIT="-XX:PermSize=256m"
export MEM_PERM_SIZE_64BIT
MEM_PERM_SIZE_32BIT="-XX:PermSize=256m"
export MEM_PERM_SIZE_32BIT
Start the Admin Server
$cd /u01/app/oracle/product/fmw11g/user_projects/domain/wcs_domain/bin
$./startWebLogic.sh
Open the Admin Console
Create the Datasource.
Stop Admin Server
$cd /u01/app/oracle/product/fmw11g/user_projects/domain/wcs_domain/bin
$./stopWebLogic.sh
Create boot.properties and update username and password
$cd /u01/app/oracle/product/fmw11g/user_projects/domain/wcs_domain/servers/AdminServer/
$mkdir security
$cd security
$vi boot.properties
username=weblogic
password=welcome1
Install WebCenter Sites
Edit startWebLogic.sh and add the below lines. Update the installation path with your installation path.
JAVA_OPTIONS="-Dfile.encoding=UTF-8 -Dnet.sf.ehcache.enableShutdownHook=true -Djava.net.preferIPv4Stack=true -Djava.io.tmpdir=/u01/app/oracle/product/fmw11g/user_projects/domains/wcs_domain/servers/AdminServer/tmp -Djava.library.path=/u01/sites/bin ${JAVA_OPTIONS}"
CLASSPATH="/u01/sites/bin:$CLASSPATH"
PRE_CLASSPATH="/u01/app/oracle/product/fmw11g/user_projects/domains/wcs_domain/CS/WEB-INF/lib/commons-lang-2.4.jar:$PRE_CLASSPATH"
Start the Admin Server
$cd /u01/app/oracle/product/fmw11g/user_projects/domain/wcs_domain/bin
$nohup ./startWebLogic.sh > AdminLogs.out &
We need to deploy the CS and CAS application into the application server.
Deploy the CS and CAS applications in the Admin Server.
Test the Application with below URL.
Click on Test and make sure below tests are successful
HelloCS is successful
PingDB is successful
DB Permission is successful
Click OK and click OK to continue the installation
This installation is not configuring LDAP into WebCenter sites and hence clicks ‘No’.
Once the installation is completed, it is advisable to stop and start the application server and check the WebCenter Sites path.
After the successful login, we get CAS Login Successful page.
Also, we can verify with below URL,